大数量量列表渲染的解决方案-虚拟列表简单实现(一)
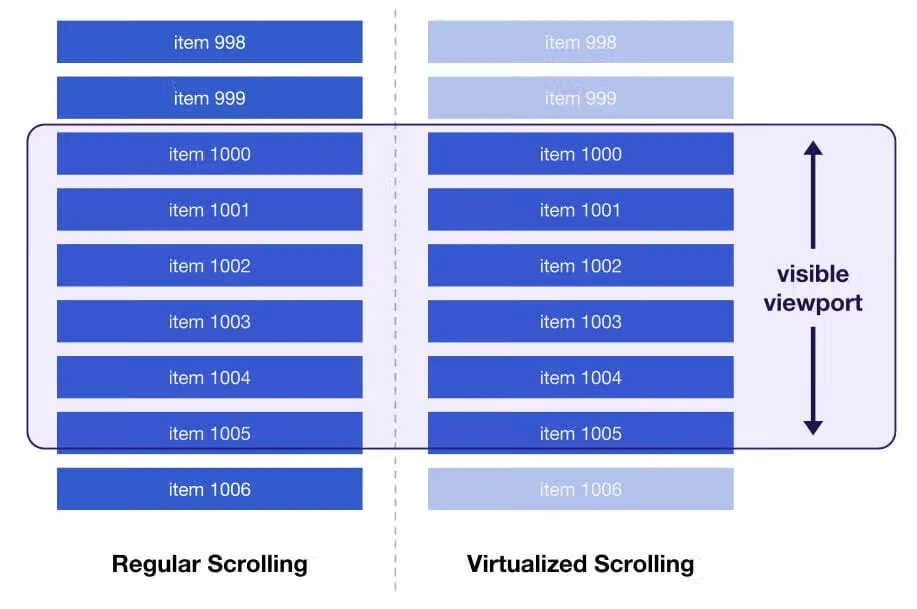
传统的渲染方案会把列表中的所有数据都渲染到浏览器中,当数据量大起来之后,DOM元素过多对于浏览器的性能压力会非常大。
虚拟列表借助了长列表需要滑动的特性,通过固定滑动窗口的高度,通过处理用户的滑动事件动态渲染需要显示的数据。这样就实现了在有限的 DOM空间里面渲染无限的数据。
但是虚拟列表也有其局限性,比如快速滑动会出现白屏,不定高的数据项可以出现渲染错误等
本篇文章主要记录一下使用 JavaScript和 Vue实现简单的定高虚拟列表,不考虑生产环境的可用性,仅作为记录和提供实现思路。
JavaScript原生虚拟列表
使用 JavaScript原生实现虚拟列表,由于没有响应式,所有使用到的数据都需要在事件处理中手动计算
创建页面结构
先写一个虚拟列表容器,.app是最外层容器,需要设置滚动为自动,.list-container为列表容器,高度为数据列表中所有项加起来的高度,容器里面的元素通过 JavaScript动态生成。
<div class="app">
    <!-- 虚拟列表容器 -->
    <div class="list-container">
    </div>
</div>
* {
    box-sizing: border-box;
}
html, body {
    padding: 0;
    margin: 0;
    height: 100%;
    width: 100%;
    display: flex;
    justify-content: center;
    align-items: center;
}
.app {
    height: 600px;
    width: 600px;
    border: 1px solid red;
    overflow-y: auto;
}
.list-container {
    height: 100%;
    width: 100%;
}
.list-item {
    width: 100%;
    height: 100px;
    border: 1px solid black;
    display: flex;
    justify-content: center;
    align-items: center;
}
定义虚拟列表需要的数据
虚拟列表的核心逻辑就是在用户滑动的时候,去计算渲染元素的起始下标和结束下标并根据最大显示数量更新待渲染的数据列表值,然后通过 JavaScript将待渲染的数据插入到列表 DOM元素中,
// 虚拟列表所需要的数据
const virtualData = {
    // 渲染元素起始下标
    startIndex: 0,
    // 渲染元素结束下标
    endIndex: 0,
    // 数据列表
    dataList: [],
    // 需要渲染的数据列表
    renderList: [],
    // 每个元素项的高度 由于是定高虚拟列表 这里写死即可
    itemHeight: 100,
    // 元素显示的最多数量
    maxCount: 0,
    // 虚拟列表容器的高度
    listHeight: 0,
    // 容器dom对象
    dContainer: undefined,
    // 列表dom对象
    dList: undefined,
    // 列表样式
    scrollStyle: {
        height: '',
        transform: ''
    }
}
初始化虚拟列表
// 初始化函数
const init = () => {
    // 获取列表项高度
    const { itemHeight } = virtualData;
    // 获取虚拟列表容器
    const dContainer = document.querySelector('.app');
    const dList = document.querySelector('.list-container');
    // 获取容器高度 并通过和列表项进行计算拿到列表中的最大显示数量
    // 这里向上取整和+1 是为了让用户在滑动过程中列表不会出现空白
    const listHeight = dContainer.offsetHeight;
    const maxCount = Math.ceil(listHeight / itemHeight) + 1;
    Object.assign(virtualData, { dContainer, dList, listHeight, maxCount });
}
计算结束下标和渲染数据列表
const computedRenderList = () => {
    const { startIndex, dataList, maxCount } = virtualData;
    // 计算结束下标 使用min方法避免数组越界
    const endIndex = Math.min(startIndex + maxCount, dataList.length);
    // 通过起始下标和结束下标获取待渲染的数据列表
    virtualData.renderList = dataList.slice(startIndex, endIndex);
    virtualData.endIndex = endIndex;
}
结算数据列表的滚动样式
const computedScrollStyle = () => {
    const { dataList, itemHeight, startIndex } = virtualData;
    // 计算已经渲染过的数据高度
    const startHeight = startIndex * itemHeight;
    // 高度为渲染中和未渲染的数据高度
    // transform 让容器下移已经渲染过的数据高度
    // 这样加起来容器中展示的滚动条就是所有数据的高度 而且用户下滑滚动时 滚动条会一直变化 数据始终在容器的可视区内渲染
    virtualData.scrollStyle = {
        height: `${dataList.length * itemHeight - startHeight}px`,
        transform: `translateY(${startHeight}px)`
    }
}
渲染数据列表
const render = () => {
    // 先计算结束下标和待渲染的数据列表
    computedRenderList();
    // 再计算样式
    computedScrollStyle();
    const { renderList, scrollStyle, dList } = virtualData;
    // 生成html 插入到列表dom中
    const listHtml = renderList.map(item => `<div class="list-item">${item}</div>`).join('');
    // 更新dom元素和样式
    dList.innerHTML = listHtml;
    dList.style.height = scrollStyle.height;
    dList.style.transform = scrollStyle.transform;
}
计算起始下标和添加滚动事件处理
const handleScroll = () => {
    const { dContainer, itemHeight, startIndex: lastStart } = virtualData;
    // 通过列表的滚动高度 / 数据项高度拿到起始下标
    const startIndex = Math.floor(dContainer.scrollTop / itemHeight);
    // 判断如果当前拿到的下标和之前的一样 那么跳过处理
    if (startIndex === lastStart) {
        return;
    }
    // 设置下标 调用渲染函数
    virtualData.startIndex = startIndex;
    render();
}

// 为容器添加滚动事件处理
const init = () => {
    //...
    dContainer.addEventListener('scroll', handleScroll);
}
到这里一个简单的定高虚拟列表核心逻辑就完成,但是还没有数据,可以添加一个加载数据的函数,每次初始化和下滑到底部时,继续加载数据。
加载数据
const loadData = () => {
    // 每次加载十条数据
    for(let i = 0; i < 10; i++) {
        virtualData.dataList.push(virtualData.dataList.length + 1);
    }
}

// 初始化函数中添加数据加载和渲染函数调用
const init = () => {
    //...
    loadData();
    render();
}

// 每次渲染到最后一个数据时 进行数据加载
const computedRenderList = () => {
    //...
    // 如果结束下标等于数据列表的长度 那么加载数据
    if (endIndex === dataList.length) {
        loadData();
    }
}
后续优化
这样简单的虚拟列表还有诸多问题,比例滑动事件频繁、快速滑动白屏等,这里主要实践一下滑动事件节流。
主要思路就是通过节流函数去控制滑动事件执行的次数
// 节流函数
const throttle = (fn) => {
    let lock = false;
    // 使用闭包
    return (...args) => {
        if (lock) return;
        lock = true;
        // 通过requestAnimationFrame进行节流 再浏览器重绘周期内只会执行一次
        window.requestAnimationFrame(() => {
            fn.apply(this, args)
            lock = false;
        })
    }
}
const init = () => {
    //...
    // 使用被节流函数包裹的滚动事件处理
    dContainer.addEventListener('scroll', throttle(handleScroll));
}
完整代码
<!DOCTYPE html>
<html lang="zh-cn">
<head>
    <meta charset="UTF-8">
    <meta name="viewport" content="width=device-width, initial-scale=1.0">
    <title>虚拟列表</title>
    <style>
        * {
            box-sizing: border-box;
        }
        html, body {
            padding: 0;
            margin: 0;
            height: 100%;
            width: 100%;
            display: flex;
            justify-content: center;
            align-items: center;
        }
        .app {
            height: 600px;
            width: 600px;
            border: 1px solid red;
            overflow-y: auto;
        }
        .list-container {
            height: 100%;
            width: 100%;
        }
        .list-item {
            width: 100%;
            height: 100px;
            border: 1px solid black;
            display: flex;
            justify-content: center;
            align-items: center;
        }
    </style>
</head>
<body>
    <div class="app">
        <div class="list-container">
        </div>
    </div>
    <script>
        const virtualData = {
            startIndex: 0,
            endIndex: 0,
            dataList: [],
            renderList: [],
            itemHeight: 100,
            maxCount: 0,
            listHeight: 0,
            dContainer: undefined,
            dList: undefined,
            scrollStyle: {
                height: '',
                transform: ''
            }
        }

        const init = () => {
            const { itemHeight } = virtualData;
            const dContainer = document.querySelector('.app');
            dContainer.addEventListener('scroll', throttle(handleScroll));
            const dList = document.querySelector('.list-container');
            const listHeight = dContainer.offsetHeight;
            const maxCount = Math.ceil(listHeight / itemHeight) + 1;
            Object.assign(virtualData, { dContainer, dList, listHeight, maxCount });
            loadData();
            render();
        }
        const computedRenderList = () => {
            const { startIndex, dataList, maxCount } = virtualData;
            const endIndex = Math.min(startIndex + maxCount, dataList.length);
            virtualData.renderList = dataList.slice(startIndex, endIndex);
            if (endIndex === dataList.length) {
                loadData();
            }
            virtualData.endIndex = endIndex;
        }
        const computedScrollStyle = () => {
            const { dataList, itemHeight, startIndex } = virtualData;
            const startHeight = startIndex * itemHeight;
            virtualData.scrollStyle = {
                height: `${dataList.length * itemHeight - startHeight}px`,
                transform: `translateY(${startHeight}px)`
            }
        }
        const render = () => {
            computedRenderList();
            computedScrollStyle();
            const { renderList, scrollStyle, dList } = virtualData;
            const listHtml = renderList.map(item => `<div class="list-item">${item}</div>`).join('');
            dList.innerHTML = listHtml;
            dList.style.height = scrollStyle.height;
            dList.style.transform = scrollStyle.transform;
        }
        const handleScroll = () => {
            const { dContainer, itemHeight, startIndex: lastStart } = virtualData;
            const startIndex = Math.floor(dContainer.scrollTop / itemHeight);
            if (startIndex === lastStart) {
                return;
            }
            virtualData.startIndex = startIndex;
            render();
        }
        const loadData = () => {
            for(let i = 0; i < 10; i++) {
                virtualData.dataList.push(virtualData.dataList.length + 1);
            }
        }
        const throttle = (fn) => {
            let lock = false;
            return (...args) => {
                if (lock) return;
                lock = true;
                window.requestAnimationFrame(() => {
                    fn.apply(this, args)
                    lock = false;
                })
            }
        }
        init();
    </script>
</body>
</html>
Vue虚拟列表
在 Vue中实现这样的定高虚拟列表非常简单,得益于响应式和计算属性的存在,DOM元素的渲染和属性计算可以完全交给框架去做,我们只用关心事件处理和数据加载就行了。
示例采用Vue3 + TypeScript + Scss 编写,仅作Demo使用
{{ item }}
/**
 * 节流函数 基于间隔事件进行节流
 * @param func 需要执行的函数
 * @param delay 间隔事件
 * @param callback 事件被节流后的回调函数
 */
export const throttleTimer = (func: () => void, delay: number, callback?: () => void): () => void => {
  let timer: number | undefined = undefined;
  return () => {
    if (timer) {
      callback && callback()
      return;
    }
    timer = setTimeout(() => {
      func()
      timer = undefined;
    }, delay)
  }
}


0 条评论